
Making cannabis edibles at home in South Africa is legal under the Cannabis for Private Purposes Act of 2024, provided you follow the rules. It gives you full control over ingredients, strength, and cost while avoiding the risks of illegal retail products. Here’s what you need to know:
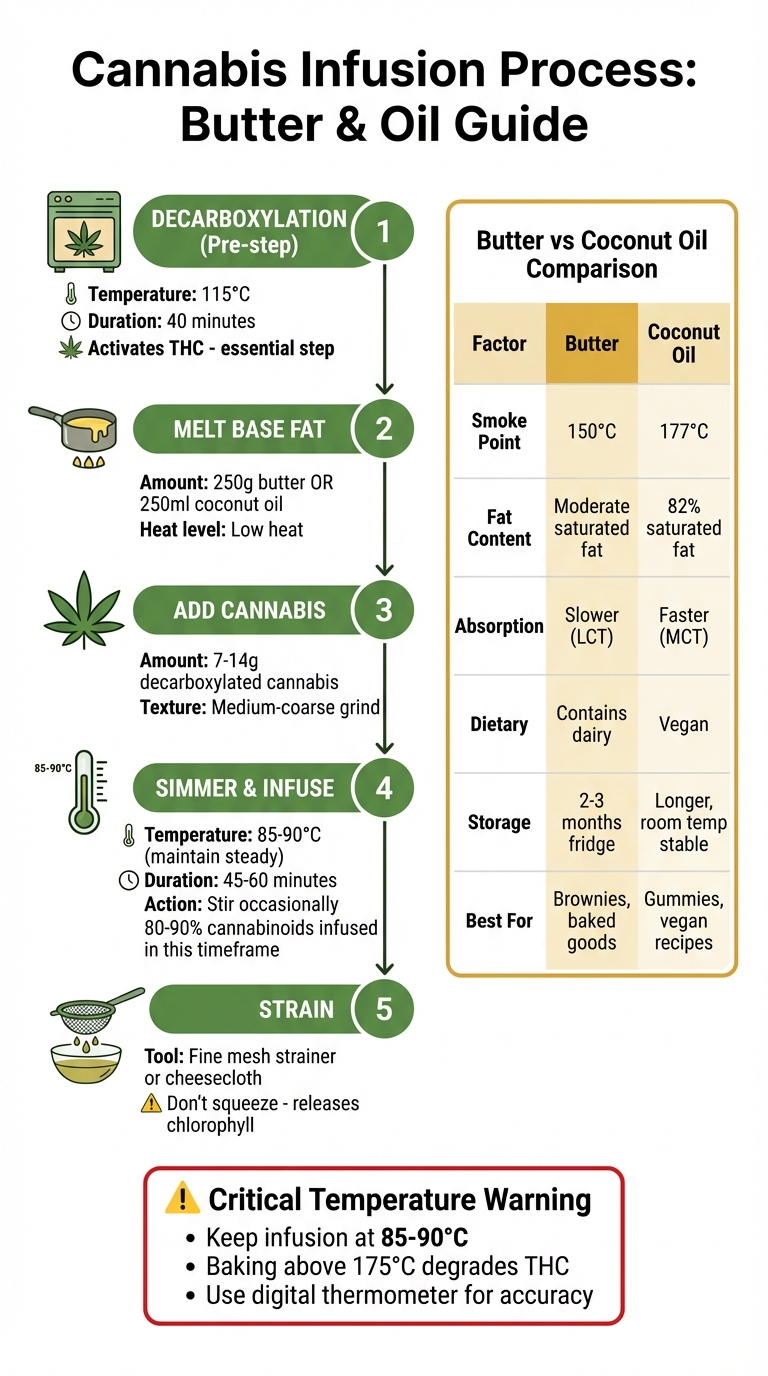
- Decarboxylation: Heat your cannabis at 115°C for 40 minutes to activate THC. Without this step, your edibles won’t work.
- Dosing: Start with 2,5–5 mg of THC per serving. Overdosing can lead to an uncomfortable experience lasting hours.
- Infusion: Use butter or coconut oil to bind THC. Simmer at 85–90°C for 45–60 minutes, then strain.
- Storage: Keep edibles in airtight containers, away from children, and refrigerate for up to 2 weeks or freeze for 6 months.
Key Recipes:
- Brownies: Bake at 120°C using infused butter for consistent results.
- Gummies: Combine fruit juice, gelatine, and cannabis oil for easy dosing.
- Energy Balls: A no-bake snack with oats, seeds, and infused oil.
Stick to the law: no selling, and keep edibles out of reach of children. Always calculate THC content carefully for safe consumption.
How to Make Edibles That Don’t Suck: Easy Weed Gummies Recipe
sbb-itb-e2e45ce
Ingredients and Tools You'll Need
Get everything ready to ensure a smooth and hassle-free preparation process.
Ingredients
To start, you'll need 7–14 g of decarboxylated cannabis flower (check out decarboxylation guidelines if you're unsure how to do this). For your infusion base, choose between 250 g of unsalted butter or 250 ml of coconut oil. Coconut oil is a great option for vegan recipes and is known to enhance cannabinoid absorption thanks to its medium-chain triglycerides.
Here's what you'll need for specific recipes:
- Cannabis brownies: 150 g flour, 200 g sugar, 50 g cocoa powder, 100 g infused butter, 2 eggs, and 5 ml vanilla extract.
- Cannabis gummies: 250 ml fruit juice, 50 g gelatine, 50 ml infused oil, and 100 g sugar.
- Cannabis energy balls: 200 g oats, 100 g nut butter, 50 g honey, 50 ml infused coconut oil, and 50 g chocolate chips.
Expect pantry staples to cost between R50–100, excluding the cannabis itself.
Tools
Having the right tools can make all the difference. Here's what you'll need:
- A saucepan to melt fats at a controlled temperature (aim for 80–90°C).
- A digital thermometer to monitor temperatures between 85–95°C, avoiding THC degradation.
- A fine mesh strainer to filter your infused mixture.
- Silicone moulds for shaping gummies or energy balls.
- Metric measuring cups and spoons for precise ingredient measurements.
- An oven tray, a grinder, and airtight jars for storage.
For premium decarboxylated cannabis flower, check out Amazol's edibles collection at https://amazol.biz/collections/edibles. If you're new to making edibles, look for strains with 15–20% THC content for a balanced infusion that's potent but manageable. A good starting ratio is 7 g of decarboxylated flower per 250 g of fat, which typically results in about 10 mg of THC per serving.
How to Infuse Cannabis Into Butter or Oil
Cannabis Edibles Infusion Process: Temperature Guide and Steps
Now that your cannabis is decarboxylated, it’s time to infuse it into butter or oil. This process allows cannabinoids to bind to fats, which is essential for creating cannabis-infused recipes. To preserve the potency of your cannabis, it’s important to keep the temperature low and steady throughout the process.
Infusion Steps
For the best results, use your decarboxylated cannabis right away. Start by melting 250 g of butter or 250 ml of coconut oil over low heat. Once melted, add 7–14 g of decarboxylated cannabis, ground to a medium-coarse texture. Let the mixture simmer gently at 85–90°C for about 45–60 minutes, stirring occasionally. Research suggests that most cannabinoids (80–90%) are infused within this time frame.
"Don't assume 'longer infusion = stronger butter.' Past a certain point, you're often just extracting more green, bitter flavours." - Annie Corum
Once the infusion is complete, strain the mixture through a fine mesh strainer or cheesecloth. Avoid squeezing the plant material, as this can release chlorophyll and sediment, which might give your infusion a harsh, grassy taste. If the final product tastes too herbal, you can try the "butter wash" method: melt the infused butter with warm water, chill it until the butter solidifies on top, and then discard the water underneath.
Butter vs Coconut Oil
Choosing between butter and coconut oil depends on your recipe and dietary preferences. Here’s a quick comparison to help you decide:
| Factor | Butter | Coconut Oil |
|---|---|---|
| Flavour retention | Rich and creamy, perfect for brownies and biscuits | Neutral (refined) or tropical (virgin) flavour |
| Smoke point | Lower (~150°C) | Higher (~177°C) |
| Dietary preferences | Contains dairy | Vegan and dairy-free |
| Cannabinoid binding | Moderate saturated fat content | High saturated fat (82%), ideal for binding |
| Absorption speed | Slower (long-chain triglycerides) | Faster (medium-chain triglycerides) |
| Storage | Keeps for 2–3 months in the fridge, 6+ months in the freezer | Longer shelf life, stable at room temperature |
Coconut oil is particularly effective due to its medium-chain triglycerides, which the body absorbs more quickly, potentially leading to faster onset effects. Butter, on the other hand, is perfect for traditional baked goods that benefit from a rich, creamy flavour. If you’re making vegan recipes, gummies, or want maximum cannabinoid absorption, coconut oil is a great choice. The right base will depend on your recipe and the effects you’re aiming for.
3 Simple Cannabis Edible Recipes
With your cannabis-infused butter or oil ready to go, it’s time to dive into three easy recipes that cater to a variety of tastes and skill levels. Whether you’re in the mood for baked goodies or quick no-bake snacks, these recipes have you covered. Measurements are provided in metric units for accuracy.
Cannabis Brownies
Makes 8 servings. Baking at a low temperature is key to preserving the potency of cannabinoids. Start by preheating your oven to 120°C. In a frying pan over low heat, melt 100 g of infused butter (or oil) with 200 g of chocolate, stirring until smooth. In a separate bowl, whisk together 4 eggs, 200 g of sugar, and 100 g of flour until the batter is smooth and lump-free. Gradually fold in the melted chocolate-butter mixture. Pour the combined batter into a greased baking pan and bake for 1 hour. To check if it’s done, insert a toothpick into the centre - if it comes out clean, your brownies are ready. Keep in mind that baking above 175°C can degrade THC, reducing the brownies’ potency. Once cooled, store them in an airtight container in the fridge for up to a week, or freeze individual portions for up to six months.
Cannabis Gummies
For a portable and shareable treat, this recipe makes about 72 gummies. Start by combining 250 ml of fruit juice, 2 tablespoons (30 ml) of honey, and 3 tablespoons (45 ml) of gelatine (or agar-agar for a vegan alternative). To ensure the cannabis oil blends properly, add an emulsifier like soy lecithin. Heat the juice and honey together, then stir in the gelatine until fully dissolved. Add 2–3 teaspoons (10–15 ml) of cannabis-infused oil along with the lecithin, mixing thoroughly. Use a dropper or pipette to fill silicone moulds for consistency and neat edges. Refrigerate for 1–2 hours until the gummies are fully set. Store them in an airtight container in the fridge for up to two weeks, or freeze them for longer storage.
"Properly made homemade gummies... will contain a precise amount of THC, CBD, and other cannabinoids." - Max Sargent
Cannabis Energy Balls
This no-bake recipe is perfect for a quick, nutritious snack and makes about 24 servings. In a mixing bowl, combine ½ cup of desiccated coconut, ½ cup of rolled oats, 4 tablespoons of cocoa powder, and ½ cup of mixed seeds. Add 4 tablespoons of honey and 6 tablespoons of cannabis-infused coconut oil, stirring until the mixture is well combined. Roll the mixture into small balls and chill in the fridge for at least 1 hour before serving. These energy balls are incredibly versatile - swap honey for agave nectar or maple syrup to make them vegan, or add a pinch of espresso powder for a mocha twist. Store them in an airtight container in the fridge for up to a week, or freeze for several months.
Dosing and Storage Guidelines
How to Dose Safely
Getting the dosage right for homemade edibles takes some careful calculation. You need to factor in losses during both decarboxylation (the process that activates THC) and infusion. Start by converting your flower weight (1 g = 1,000 mg) and multiply it by the THC percentage. Then, apply an 87.7% decarboxylation yield and a 60% infusion efficiency.
Here’s an example: If you use 2 g of flower with 20% THC, you start with 2,000 mg × 0.20 = 400 mg THC. After accounting for decarboxylation and infusion losses, the final total is about 211 mg of THC, which works out to roughly 17.6 mg per brownie if you make 12 servings.
For those new to edibles, it’s best to start with just 5 mg of THC per serving. This allows you to gauge how your body reacts before increasing the dose.
Patience is key when it comes to edibles. They can take anywhere from 30 minutes to 2 hours to kick in because the liver converts THC into a more potent form. Silas, the founder of Flavor365, offers this advice:
"The biggest mistake you can make is thinking 'it's not working' after an hour and taking more. Always wait a full two hours, or even three, before considering a redose".
Once you’ve nailed the dosage, the next step is ensuring proper storage to keep your edibles fresh and effective.
How to Store Edibles
Storing edibles correctly is crucial for maintaining their potency and flavour. Heat, UV light, air, and humidity are the main enemies of THC. UV rays, in particular, can break THC down into CBN, which has much weaker psychoactive effects. To avoid this, use airtight, dark glass containers for storage. Steer clear of plastic for long-term use, as it can leach chemicals into the fats.
For short-term storage, keep your edibles in the fridge - they’ll stay fresh for 1–2 weeks. If you need them to last longer, freezing is your best bet, as it preserves them for up to 6 months. Cannabis Carl from tCheck points out:
"The butter will go rancid way before the cannabinoids begin to degrade".
Always label your containers clearly with "Contains THC", the date made, and the dose per serving. This prevents any accidental consumption, especially if others share your fridge or freezer. And if you notice any unpleasant smells, visible mould, or a slimy texture, it’s time to toss them out.
If you’d rather skip the guesswork and go for professionally made edibles with consistent dosing, check out the range available at https://amazol.biz/collections/edibles.
Conclusion
Creating successful cannabis edibles boils down to three key steps: proper decarboxylation, accurate dosing, and careful recipe execution. Decarboxylation is the process that transforms inactive THCA into psychoactive THC - without it, your edibles simply won’t have the desired effects.
Getting the dosage right is just as important. When calculating the THC content per serving, account for common losses during activation and infusion. This ensures each brownie or gummy delivers a predictable experience without any unpleasant surprises. Keep in mind that edibles can take up to two hours to take effect, so patience is crucial. Following recipes closely also helps maintain the potency of the cannabinoids.
Paying attention to the finer details during preparation can make a big difference. For instance, controlling the cooking temperature, using fats like coconut oil to enhance absorption, and sticking to a coarse grind rather than a fine powder can all improve both the potency and flavour. Adding lecithin to your infusion is another small step that can enhance the overall quality of your edibles.
If you’d rather skip the effort, professionally made edibles are a convenient option. They come with reliable dosing and consistent quality. Check out the selection at https://amazol.biz/collections/edibles for ready-to-enjoy options with precise THC content. Whether you’re crafting edibles at home or opting for premium pre-made ones, a thoughtful approach ensures a safe and enjoyable experience.
FAQs
What are the legal rules for making cannabis edibles at home in South Africa?
In South Africa, while it's legal to privately grow and use cannabis for personal purposes, creating cannabis edibles at home is still against the law. This means making cannabis-infused treats like baked goods or gummies is not allowed under current regulations.
The law explicitly prohibits preparing food items that contain THC, the psychoactive ingredient in cannabis, even if it's for private use. Violating these rules could result in legal trouble. Staying updated on the latest legislation is essential to ensure you're on the right side of the law.
How can I calculate the correct THC dosage for my homemade edibles?
To figure out the right THC dosage for your homemade edibles, you’ll first need to know the THC percentage of your cannabis. Let’s say your cannabis has 15% THC - this means 1 gram contains 150 mg of THC. Multiply this amount by the total grams of cannabis you’re using in your recipe to determine the total THC content.
Next, consider the infusion efficiency. Not all the THC will transfer into your oil or butter during the infusion process. Typically, efficiency ranges between 60–80%. Once you’ve factored this in, divide the adjusted THC content by the number of servings to calculate how much THC is in each edible. For instance, if your infusion contains 300 mg of THC and you make 10 servings, each edible will have roughly 30 mg of THC.
If you’re new to edibles, always start with a low dose and give it at least 1–2 hours before deciding whether to consume more. This helps you better understand how it affects you without overdoing it.
What is the best way to store cannabis edibles to keep them fresh and potent?
To keep your cannabis edibles fresh and potent, proper storage is key. Use an airtight container and place it somewhere away from light, heat, and moisture. A cool, dark, and dry spot works well for most edibles. For items like baked goods or chocolates, refrigeration or freezing can significantly extend their shelf life.
Gummies, for instance, stay in better shape when stored in a cool location or the fridge, as this prevents them from melting and maintains their quality. The same goes for chocolates - keeping them in a cool, dark place or refrigerated helps avoid melting and oxidation. Steer clear of exposing your edibles to direct sunlight or high humidity, as these conditions can break down cannabinoids and reduce their effectiveness over time.
0 comments